

KEDAI KEK & ROTI KHATIJAH
Secantik Rupa Sesedap Rasa
10. Set a Timer
The first thing you should do after inserting the pan into the oven is set a timer. It's easy to forget when you keep track of the time in your head. You are better off setting a device with a loud, obnoxious alarm so you don't run the risk of burning your precious, hard-earned work.
1. Read the Recipe in Its Entirety
Read the entire recipe slowly. That way, ingredients, tools, and steps aren't accidentally overlooked. Baking is about precision, so it's very important that you are familiar with the recipe before beginning. Read it two or three times, even, to make sure everything sounds clear.
2. Pull Out All the Ingredients and Tools Needed
Prior to beginning the recipe, pull out all of the ingredients and tools that the recipe calls for. Then double-check that you have everything. There's nothing worse than realizing you are missing a crucial ingredient or tool halfway through making the recipe.
3. Bring the Ingredients to Room Temperature
Oftentimes, butter and eggs need to come to room temperature for a recipe. Pull out those ingredients, and store them on the counter several hours prior to making the recipe. Forgot this step? Grate butter, and it'll come to room temperature much faster; try this trick for room-temperature eggs in a flash.
4. Properly Prepare Cookie Sheets or Cake Pans
If the recipe calls for the cake pan to be greased or for the cookie sheet to be topped with parchment paper, then follow the direction. It will save you from burned, sticky, or broken confections, plus cleanup will be a breeze. You don't want to waste hours of scrubbing hardened crumbs off your bakeware.
5. Preheat the Oven
Most recipes will remind you to preheat the oven at the start of the recipe; get in the habit of preheating the oven before you put anything in it.
6. Use Liquid and Dry Measuring Cups
Unless a recipe indicates that you should only use one type of measuring cup, assume that liquids (milk or water) should be measured out with a liquid measuring cup and dry ingredients (sugar, flour, nuts, and chocolate chips) should be measured out using nested dry measuring cups. Or better yet, use a scale for the most accurate results.
7. Sift Dry Ingredients
It can be a pain, but sifting the dry ingredients improves the overall texture of the baked good plus gets rid of any lumps and clumps. Sift the ingredients into a large bowl or onto wax paper to avoid a mess.
8. Crack Eggs in a Separate Bowl
It's a bad idea to crack eggs directly into the batter bowl, because there's a greater risk of tainting it with eggshell shards or a rotten egg. Instead, crack each egg individually into a separate bowl, check for any shell, and make sure the yolk isn't broken before pouring the raw egg into the batter bowl. Remove shards by taking the empty eggshell half and using it to scoop the shell bits out of the gelatinous egg.
9. Combine Ingredients According to the Recipe
I've seen it more than once — some newbies to baking will dump all the ingredients together in the same bowl at the same time. It sounds obvious, but consult the recipe, then slowly and carefully add each ingredient into the bowl.


Baking Tips for Flawless Cakes

1 Avoid Using Cold Eggs
Sure, you know to bring the butter to room temperature, but it’s just as important for eggs—otherwise the mixture won’t emulsify properly. If you’re short on time, microwave cut-up butter on low in 5-second intervals, checking in between, and place eggs in a bowl of warm water for 10 to 15 minutes.

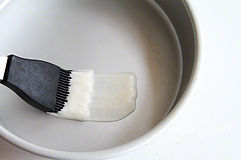
3. Use a Pastry Brush to Butter the Pans
You’ll get better coverage than with a piece of butter in paper—plus, it makes buttering parchment a breeze. Simply swipe the brush over a tablespoon of very soft butter, then onto the pan or paper.

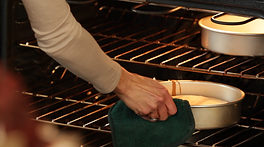
4. Position the Pans as Close to the Center of the Oven as Possible
They shouldn’t touch each other or the oven walls. If your oven isn’t wide enough to put pans side by side, place them on different racks and slightly offset, to allow for air circulation.
5. Rotate the Pans During Baking
This will ensure even baking. But wait until the cake is set—about two-thirds of the way through the baking time—to prevent collapse. If you’re using more than one rack, this is also the time to swap the pans.

6. Cool Cakes Upside Down
This will flatten out the tops, creating easy-to-stack disks for layer cakes. If the top of a cake is still too rounded, slice it off with a serrated knife.
2. Measure the Flour Properly
Spoon flour into a dry measuring cup, then sweep off the excess with a knife. Don’t scoop it directly from the bag with a measuring cup. The flour will become compacted, and you’ll get more than you need for the recipe.
baker’s dozen: Our 12 plus 1 best baking tips!
Use scales
Baking is an exact science and measuring with cups and spoons can lead you to diverge by as much as 10 to 20%. So, how can you not invest in a kitchen scale! You can get them for the same price as a 10 kg bag of flour (come on, you do have kitchen appliances that are way pricier that you never use) and with great artisan bakers all over the world leading by example, you just need to jump on board if you want to get consistently great baking results.
Follow the recipe and repeat
Take one recipe you like and stick with it for a while. First make the recipe as described, practice, adjust and fine tune it until it is completely to your liking and you can dream it. This way you will learn much more and more quickly than by constantly jumping from one recipe to the next.
Use great quality products
Yes it matters! Quality and freshness of products and especially the quality of flour will have a big impact on your baking result. It will give you better taste, texture, appearance and nutritional value.
Practice different techniques
Let time and techniques like autolyse and stretching and folding help you with the development of your dough
Check your temperatures
The right temperature is the single most critical variable in baking. If possible use a digital thermometer to measure water and dough. A few degrees difference in dough temperature can change the duration of the bulk fermentation or the final proofing a lot. As a rule, we aim for a dough temperature around 24ºC / 75ºF and our recipes proofing times are based on this.
Know your oven and use steam
How accurate does your oven indicate the temperature? It is very important to adjust the temperatures given in any recipe to the working and dimensions of your oven. Good baking results depend on it. The same can be said for the introduction of steam, it will allow the dough to expand during the first stages of the baking process.
Practice your scoring
Scoring dough can be tricky and you need to practice it a lot to get the hang of it, but it’s also part of the fun, especially as you find yourself getting better at it. Make sure your blade or knife is very sharp and make swift and confident slashes, but at the same time be gentle (iron hand in velvet glove).
Learn a bit about the science behind bread baking
Get to know more about the how and why of your dough, working of yeast and properties of ingredients to understand the effects of time, temperature, liquid and types of flour used. By a good baking book that teaches you some basic bread science.
Get used to the sticky!
Working with high hydration doughs can be difficult. But please don’t spoil it by adding tons of flour until you think you can handle the dough. Do not start out with the stickiest of dough recipes. Get comfortable with a slightly sticky dough first and take it from there.
Know that time is your friend in many ways
Time and timing are everything to a baker. Giving the dough enough time means better taste and texture for your loaves. Getting the timing right and proofing your loaf to perfection, so it will get that nice oven spring, is also something that needs practice and constant attention. So make sure to give your bread undivided time and attention, making sure there are no distractions and errands to run while baking. The baking experience will be much more relaxed and the results better!
Do not get discouraged after the first bake
Do not be discouraged if your first bake is not perfect, especially with sourdough bread. This is all perfectly normal. Like with all baking you need to learn to understand your dough and its quirks in combination with your surroundings, your material and ingredients. There are lots of factors that need to come together. In the meantime, your not so perfect looking loaf will very probably still be very edible and even better than anything store bought. And there’s no substitute for practice!
+1 Pass on your baking skills!
Learning how to bake your own bread is a skill for life. Next to sharing home baked bread, it is also much fun and very rewarding to pass on your own baking skills to others. Get family members, friends, the next generation or people who need or want to be (more) self sufficient enthusiastic about making their own real bread. Because there are so many reasons why home baking is best!
Make notes
Buy a dedicated bread notebook (the old version, made of paper) and write down the exact amounts, dates, times and temperatures (room, oven, water and dough) each time you bake. Do write your notes down while you go, do not bet on the fact you think you will remember them the next time you bake, because you probably will not. If possible use a digital thermometer to measure the temperature of your water and dough. Make notes on results and next time improvements. Keep score of what works and what doesn’t.